Setup
2.1 Mounting the Controller
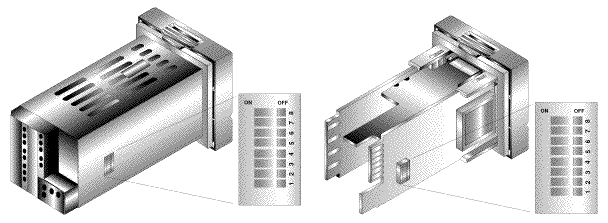
If necessary,
the rear connector assembly may be removed from the main case for wiring
(see Figure 2.1a for Square Mount, Figure 2.1b for Round Mount).
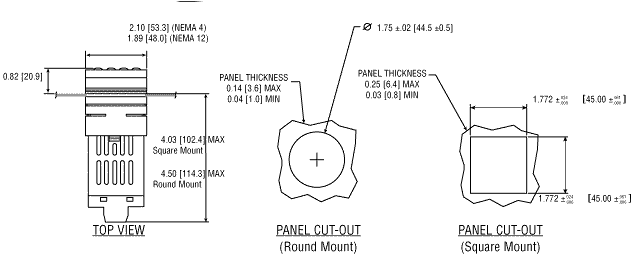
Square
Mount Micro Controller Mounting Instruction

Figure
2.1a - Mounting the Square Mount Controller
Round Mount Micro
Controller Mounting Instructions
1.
Separate the display from the meter by squeezing the case (where
shown) and then unplugging the cable from the meter.
2. Slide the retainer over the rear of the case, but do not
engage serrations on case.
3. Pass the cable (from the display) thru a 1 3/4" diameter
hole in the mounting panel and connect to the meter (take care to
center the connector on the mating pins). While squeezing the case,
press the display and meter squarely together until they connect.
4. Check the display and gasket for proper alignment, then
slide the retainer tight against the backside of the mounting panel. |
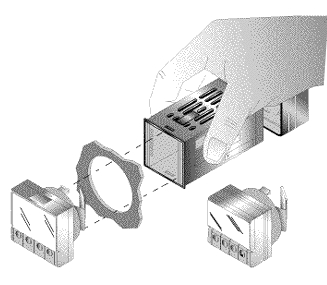 Figure
2.1b
Figure
2.1b
Mounting the round mount controller
|
2.2 Front Panel View
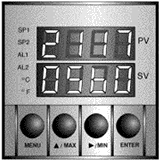
Figure 2.2
Front Panel Display
|
| Front
Panel Annuciators |
|
SP1
|
Setpoint
1 indicator |
|
SP2
|
Setpoint
2 indicator |
|
C
|
Alarm
1 indicator |
|
AL2
|
Alarm
2 indicator |
|
░C
|
░C
unit indicator |
|
░F
|
░F
unit indicator |
|
PV
|
Upper
display shows the Process Value |
|
SV
|
Lower
display shows the Set Point Value |
|
MENU
|
Changes
display to Configuration Mode and advances thru menu items* |
 /MAX /MAX
|
Used
in program mode and peak recall* |
 /MIN /MIN
|
Used
in program mode and valley recall* |
|
ENTER
|
Accesses
submenus in Configuration Mode and stores selected |
2.3
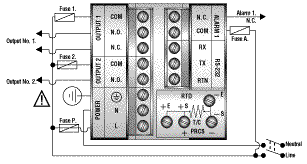
Rear Panel View
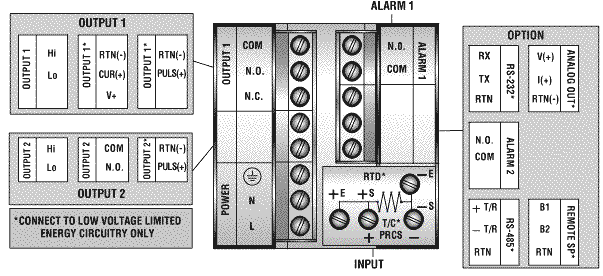
Figure 2.3
Typical Rear Connector Label and Possible Labels of Different Models
Rear
Panel Connector Labels CE
Approval Pending for solid relay (SSR) Option
|
POWER
|
AC
Power Connector: All models |
|
INPUT
|
Input
Connector: All models TC, PR (Process) RTD |
|
ALARM
1
|
ALARM
1 relay SPST, programmable: All models |
|
OUTPUT
1
|
Control
Output 1: Based on one of the following models.
Relay
SPDT, Voltage and Current, Solid State Relay ,Pulse.
|
|
OUTPUT
2
|
Control
Output 2: Based on one of the following models:
Relay SPST Normally Open, Solid State Relay, Pulse. |
|
OPTION
|
Based
on one of the following models:
RS232C, Isolated Analog Out, RS485, Alarm 2 Relay SPST, programmable,
Remote Setpoint |
2.4
Mechnical Installation
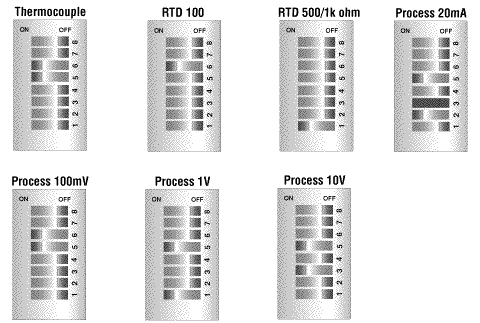
Dip Switch Configuration
| The
settings of the DIP switch must be verified or set to comply with
your selection at the Input/Type menu (see Section 3.0 for Input/Type).
The DIP switch is accessible through an opening on the side of the
case. After carefully removing the controller from the case, see
Section 2.1 for instructions, locate the dip switch (see Figure
2.4) and set the switches according to the following tables. |
 Figure
2.4 Dip Switch settings are shown in OFF
position
Figure
2.4 Dip Switch settings are shown in OFF
position
|
Dip Switch
Settings
2.5
Electrical Installation
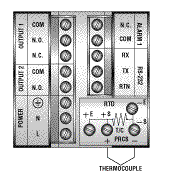
POWER CONNECTION
EXAMPLES
 The
Productive Conductor terminal must be connected for safety reasons The
Productive Conductor terminal must be connected for safety reasons
|
FUSE
|
Connector
|
Output
Type
|
For
110Vac
|
For
230Vac
|
|
FUSE
1.
|
Output
1
|
Realy
|
5A(T)
|
3A(T)
|
|
FUSE
2.
|
Output
2
|
Realy
|
5A(T)
|
3A(T)
|
|
FUSE
P.
|
Power
|
N/A
|
50mA(T)
|
100mA(T)
|
|
FUSE
A.
|
Alarm
1
|
Relay
|
3A(T)
|
3A(T)
|
Note: This
Installation of fuses is optional, depending on level of protection required.
Values shown are minimum recommendations for the protection of the controller.
For a specific load, consult the respected electrical specification to
select a suitable.
2.5.1
Thermocouple
 Figure
2.5.2
Figure
2.5.2
Thermocouple Wiring Hookup
|
INPUT
CONNECTION EXAMPLES
The figure
below shows the wiring hookup for any thermocouple type. For example,
for Type K hookup, connect the yellow wire to the + (+S) terminal
and the red wire to the û (ûS) terminal. When configuring your
controller, select Thermocouple and Thermocouple type in the Input
Type menu (see part 3). |
2.5.3
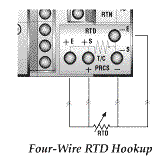
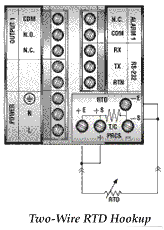
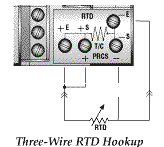
Two/Three-Wire RTD
The figures below
show the input connections and input connector jumpers required to hookup
a 2, 3 or 4-wire RTD.
|
|
The
two-wire connection is the simplest method, but does not
compensate for lead-wire temperature change and often requires calibration
to cancel lead-wire resistance offset. |
|
|
The
three-wire
connection works best with RTD leads closely equal in resistance.
The controller measures the RTD, plus upper and lower lead drop
voltage and the subtracts twice the measured drop in the lower supply
current lead producing excellent lead-resistance cancellation for
balanced measurements. |
|
The
four-wire RTD hookup is applicable to unbalanced lead resistance
and enable the controller to measure and subtract the lead voltage
which produces the best lead-resistance cancellation.
When configuring your controller, select RTD type and RTD value
in the input .Type menu (see part 3) |
2.5.4
Process Current
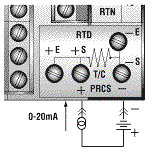
Figure
2.5.4 Process Current Wiring Hookup
|
The
figure shows the wiring hookup for process current 0- 20mA.
When configuring your controller, select Process type in the
Input Type menu (see part 3). |
2.5.5
Process Voltage
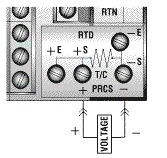
Figure
2.5.5 Process Voltage Wiring Hookup
|
The
figure shows the wiring hookup for process voltage 0 - .1V, 0
- 1V, 0 - 10V.
When configuring your controller, select Process type in the
Input Type menu (see part 3). |
|
 TOC
TOC
 Back
Back
 Next
Next